Navigationshilfen
Aktuell leider nur in englisch verfügbar
How to activate, add and use the navigation webpart and the chapter navigation tree.
Summary
It is one thing to store all necessary information of your company in a wiki, but it is not worth a toss without any structure. BlueBridge offers an easy way to structure your information in your wiki in different chapters and subchapters. In addition the BlueBridge Wiki Extensions also offer two different ways to help the visitors of the wiki to navigate within that structure:
- the navigation webpart
- can be added as other webparts - no coding or scripting needed
- shows all main chapters - for a fast navigation within the whole wiki library
- shows all subchapters of the currently visited main chapter - for an easy navigation within the current chapter
- hides subchapters of other main chapters - for not getting lost in too many navigation options
- the chapter navigation
- can be added via feature - very less effort for library-wide navigation
- located below the quicklaunch on the left hand side of the wiki pages - does not reduce space of your content
- shows only main chapters - to increase readability
- subchapters can be expanded and collapsed on demand - to keep focus on the currently needed chapters
Adding the navigation webpart
To add the navigation webaprt, follow the instructions of the video tutorial above or the instructions below.
Please be aware that the BlueBridge Wiki Extensions need to be installed and licensed before you can use the navigation webpart.
You also need to make sure, the additional wiki fields have been added for the current wiki library and there are already entries in these columns.
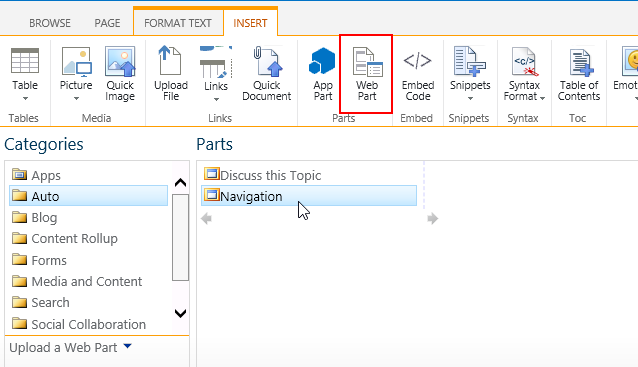
Bring the respective wiki page to edit mode, click into the section you want to add the webpart to, click on the button "Webpart" in the ribbon "INSERT".
Look for the navigation webpart and click on add to finally add the webpart to your page.

Adding the chapter navigation tree
To add the chapter navigation, you can as well follow the respective video tutorial above or follow the instructions below. Again you need to make sure the BlueBridge Wiki Extensions are installed and licensed, the additional wiki fields have been added and at least one wiki page provides a filled chapter name and number value. Navigate to the "Site Settings", using the gear icon on the top of the page. Find the link "Site Features" and click it. Look for the feature "BlueBridge Chapter Navigation" and activate it. Go back to the homepage of your site. The chapter navigation tree should now be visible below the quicklaunch. Please be informed that the information shown in the tree may take up to five minutes to update.